Introduction
Cloudflare is a powerful platform that enhances your website's speed, security, and reliability. Whether you're a beginner or an experienced webmaster, learning how to set up Cloudflare can significantly improve your website's performance and protect it from cyber threats. With its robust features like a global content delivery network (CDN), DDoS protection, free SSL certificates, and caching, Cloudflare ensures faster load times and enhanced security for websites of all sizes.
In this Cloudflare Setup Guide, we’ll walk you through the step-by-step process to get started with Cloudflare, helping you unlock its full potential to optimize your website and safeguard it against online threats.
What is Cloudflare?
Cloudflare is a content delivery network (CDN) and security platform designed to optimize website performance and protect against malicious attacks. It offers features like DNS management, DDoS protection, SSL/TLS encryption, caching, and more. By integrating Cloudflare, you can ensure faster load times, enhanced security, and better user experiences.
How to Set Up Cloudflare: A Step-by-Step Guide
We will walk you through the complete set up in the How to Set Up Cloudflare Guide. Let's start:
Step 1: Sign Up for a Cloudflare Account
To get started with Cloudflare:
- Visit the Cloudflare website.
- Click on the Sign Up button.
- Enter your email address and create a strong password.
- Verify your email address if prompted.
💡 Pro Tip: Use an email address you frequently check to stay updated on any alerts or notifications from Cloudflare.
Step 2: Add Your Website to Cloudflare
Once your account is set up, follow this How to Cloudflare Setup Guide by logging into your dashboard and adding your domain.
1. Log in to your Cloudflare dashboard.
2. Click on the Add button. 
3. Click on Existing Domain.
4. Enter your existing domain name.
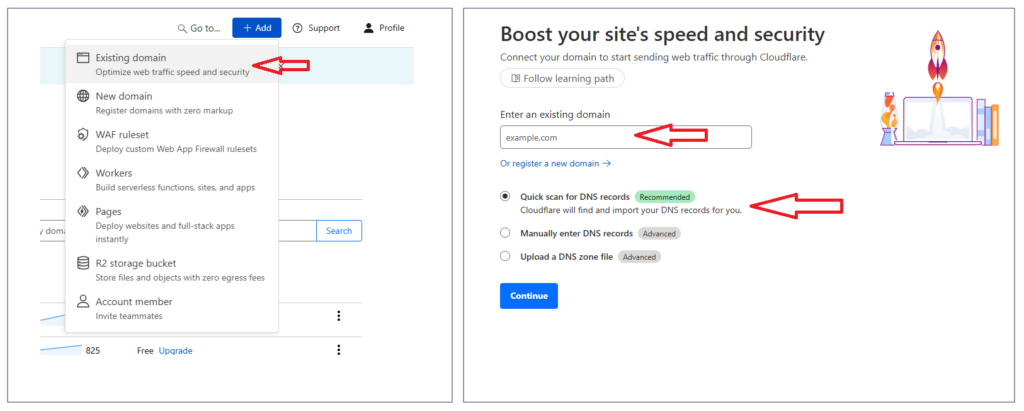
5. By default, "Quick scan for DNS records Recommended" is checked. Cloudflare will find and import your DNS records for you.Cloudflare will scan your DNS records automatically.
Continue.
💡 Why This Matters: Adding your site allows Cloudflare to manage its DNS records and optimize its performance.
Step 3: Choose a Plan
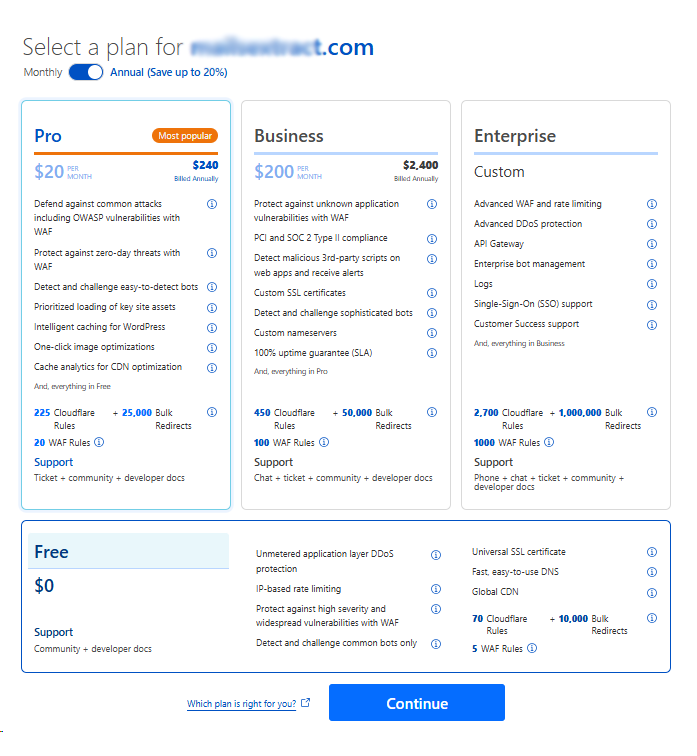
Cloudflare offers several plans:
- Free Plan: Ideal for small websites or personal blogs.
- Pro Plan: Includes advanced performance and security features.
- Business Plan: Designed for larger websites requiring enterprise-level support.
- Select the plan that best suits your needs.
- Click Continue to proceed.
💡 Recommendation: Start with the Free Plan if you're new to Cloudflare and upgrade as needed.
Step 4: Review Your DNS Records
After adding your site:
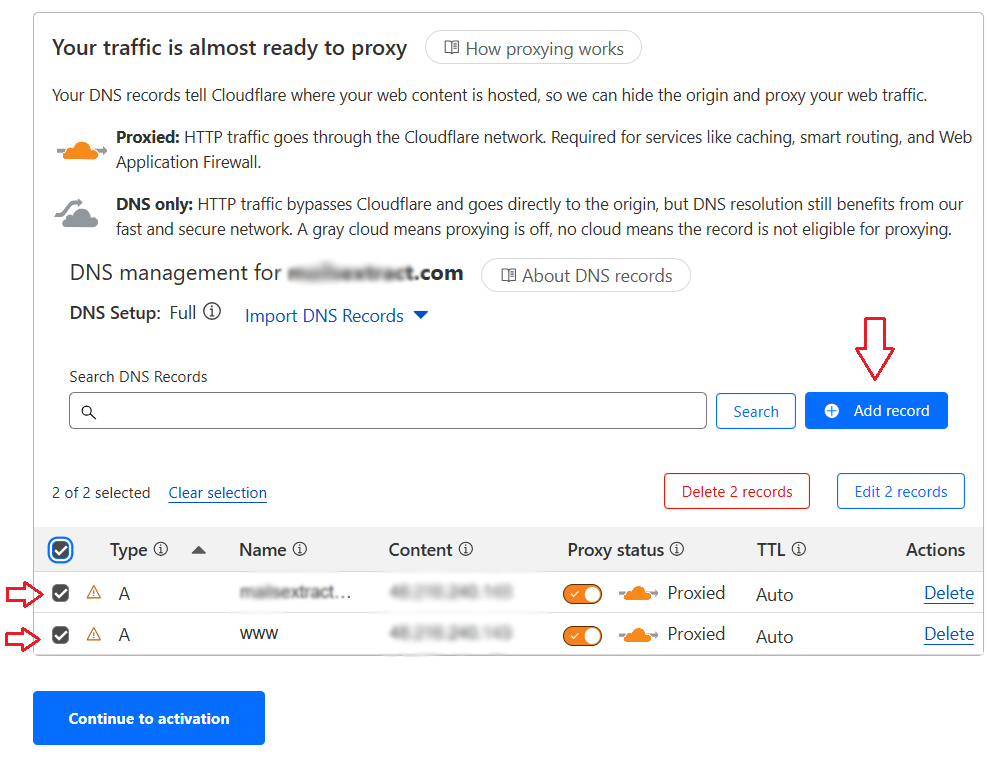
- Cloudflare will display all detected DNS records (e.g., A records, CNAMEs).
- Verify that these records match your current setup.
- If any records are missing, click Add Record to input them manually.
- Once verified, click Continue.
💡 Important: Ensure all critical DNS records (e.g., mail servers) are accurate to avoid disruptions.
Step 5: Update Your Nameservers
To connect your domain to Cloudflare:
Cloudflare will provide two nameservers (e.g., ns1.cloudflare.com and ns2.cloudflare.com).
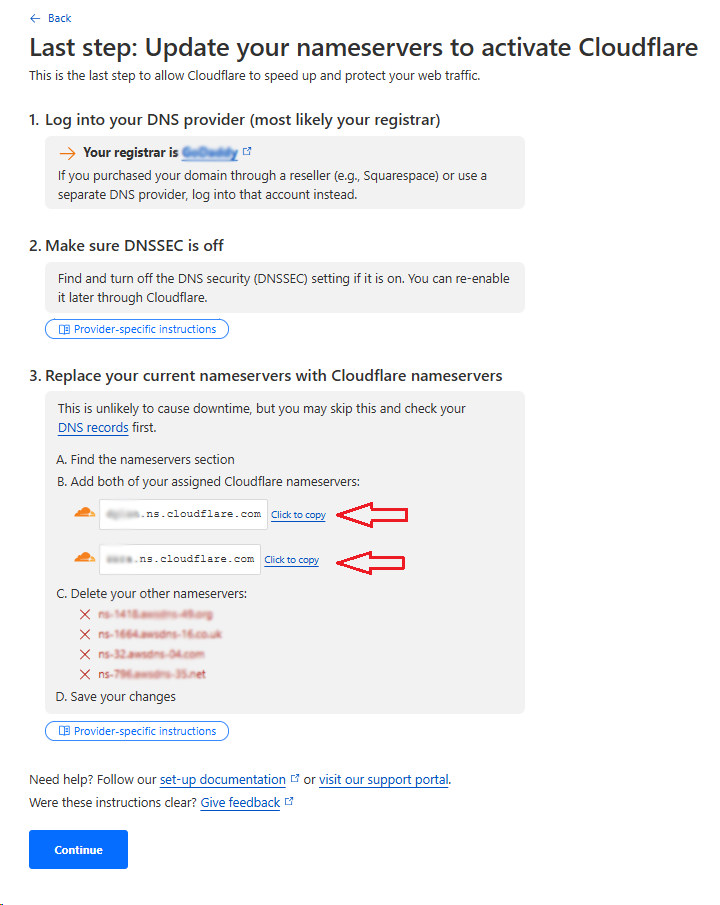
- Log in to your domain registrar (e.g., GoDaddy, Namecheap).
- Navigate to the DNS or Nameservers settings for your domain.
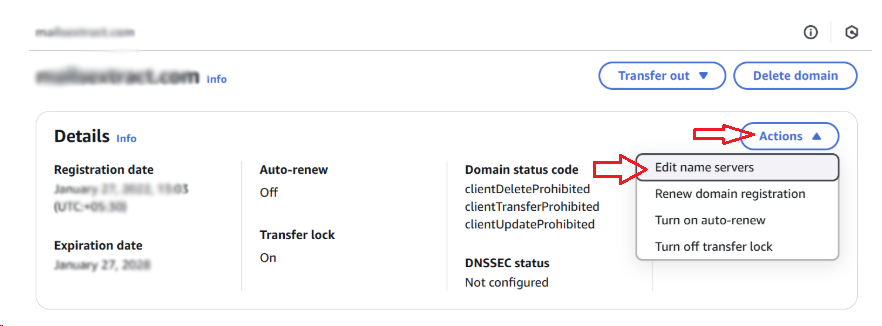
Replace the existing nameservers with the ones provided by Cloudflare.
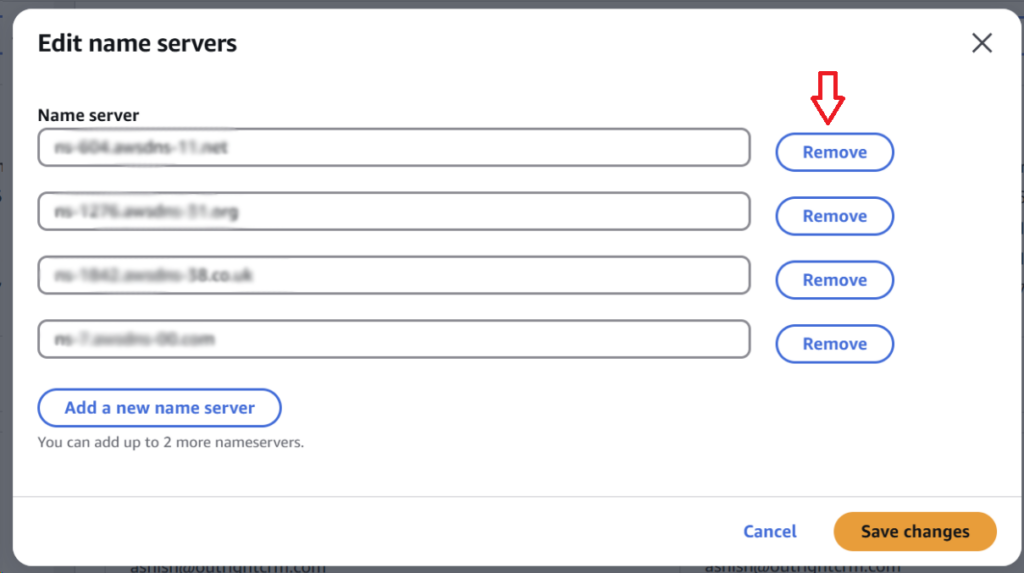

Save the changes.
💡 Note: Nameserver updates may take up to 24 hours to propagate globally.
Step 6: Enable Key Features
Once your site is connected, enable essential features for optimal performance and security:
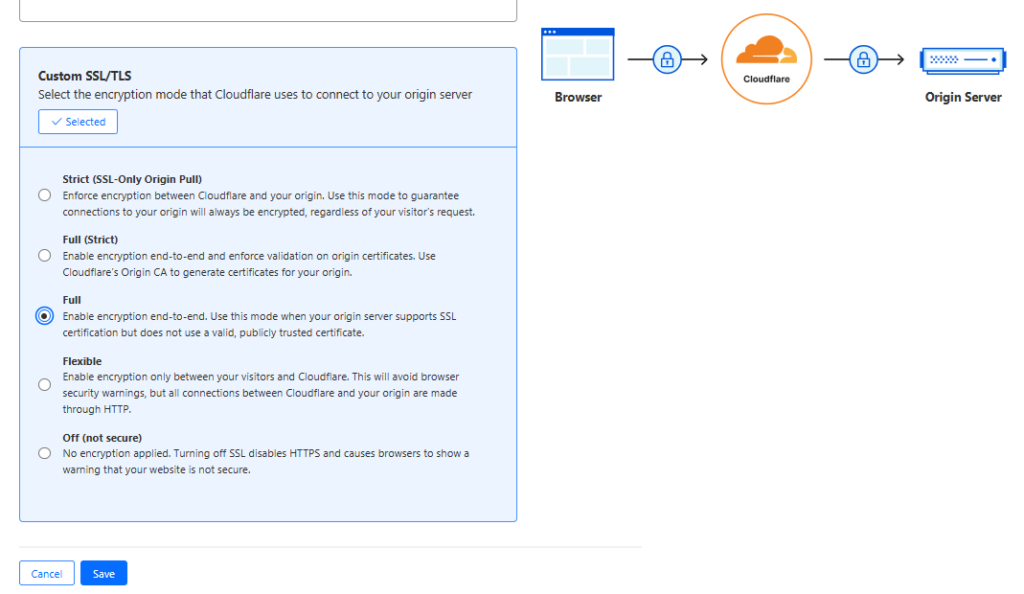
a) Enable SSL/TLS Encryption
- Go to the SSL/TLS tab in the dashboard.
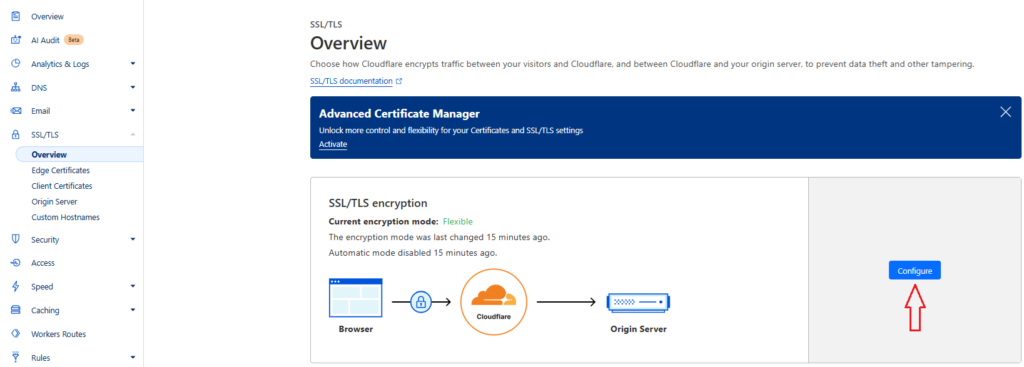
Select an encryption mode:
- Flexible: Encrypts traffic between visitors and Cloudflare only.
- Full (Recommended): Encrypts traffic end-to-end with an SSL certificate on your server.
- Ensure HTTPS is enabled for secure connections.
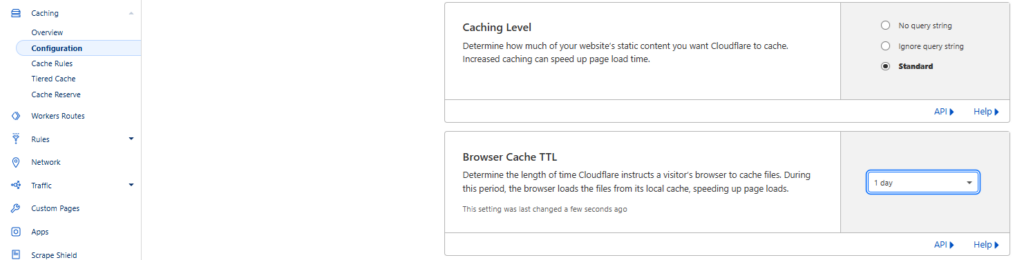
b) Set Up Caching
- Navigate to the Caching tab.
- Enable features like Browser Cache TTL and Always Online™ mode for faster load times. If you're looking for a detailed guide on how Cloudflare's caching can drastically speed up your website, check out this article on Cloudflare cache to speed up your website.
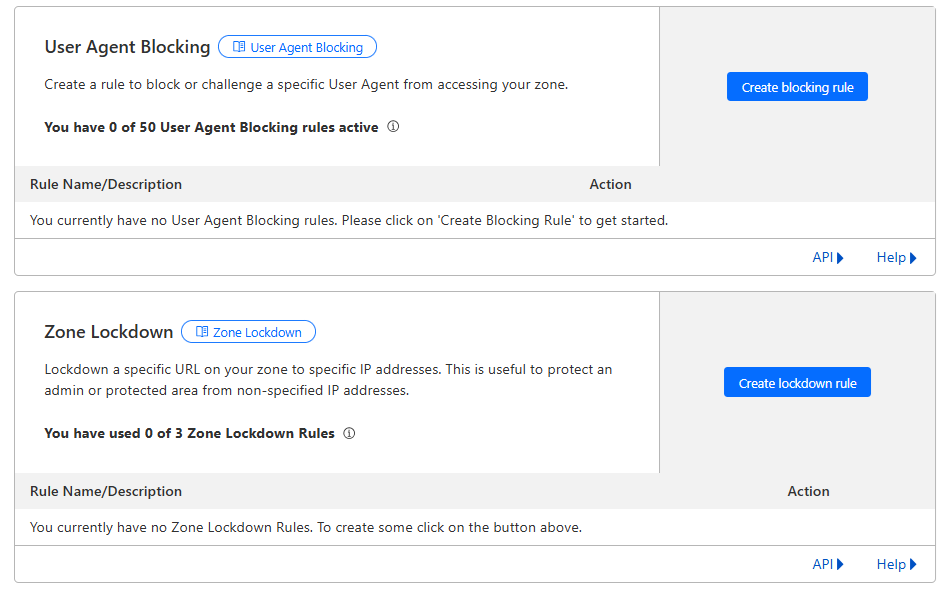
c) Configure Firewall Rules
- Go to the "Security" Tab – In the left-hand menu, look for "Security" and click it.
- Find "WAF" (Web Application Firewall) – The Firewall rules and settings are now under "WAF" (Web Application Firewall) within the Security section.
- Manage Firewall Rules – Here, you can set up firewall rules, bot protection, and security settings.
- Set up rules to block malicious traffic or restrict access based on IP addresses or countries. As discussed in this article about how Cloudflare makes websites faster and more secure, optimizing your firewall is crucial for site security.
d) Optimize Speed
- Under the Speed tab, enable features like Auto Minify (removes unnecessary characters from code) and Brotli compression for faster page loads.
Step 7: Test Your Website
After completing the setup:
- Visit your website using a browser to ensure it loads correctly.
- Check for the padlock icon in the address bar, indicating HTTPS is active.
- Use tools like GTmetrix or Google PageSpeed Insights to measure performance improvements.
💡 Pro Tip: Regularly monitor your site's performance using Cloudflare's analytics dashboard.
Benefits of Setting Up Cloudflare
By following this How to Set Up Cloudflare: A Step-by-Step Guide, you unlock several benefits:
- Faster website load times due to caching and CDN optimization.
- Enhanced security with DDoS protection, WAF, and SSL/TLS encryption.
- Improved SEO rankings thanks to better site speed and HTTPS implementation.

Conclusion
Leraning How to Set Up Cloudflare is a simple yet impactful way to boost your website’s performance and security. This step-by-step guide ensures you can easily integrate Cloudflare into your site without technical expertise.
By using this guide as a reference, you'll not only enhance user experience but also improve search engine rankings—making it easier for visitors to find and trust your website!